Form a School Disaster Management Committee (SDMC)
- Over-all Coordinator
- First Aid Team
- Fire Safety Team
- Communication Team
- Building Safety Inspection Team
- Evacuation Team
- Site Security Team
Prepare EARTHQUAKE SURVIVAL KIT
STAGE 2: DEVELOPING THE EARTHQUAKE EVACUATION PLANBasic items inside an earthquake survival kit:
- First aid kit
- alcohol
- bandages
- absorbent cotton
- gauze
- masks
- adhesive plasters
- medicine
- tweezers
- Food
- Bottled water
- Flashlights and extra batteries
- Radio (battery operated)
- Lighters and matches
- Whistle
- Knife
- Blankets and spare clothes
- Rope - at least 7 meters long
- Toiletries
- Pen and paper
- Emergency contact numbers
- Cash
SDMC should
- Have the yearly update on information of school population
- Prepare the most recent school map
- Prepare the building floor plan of each building
SDMC should conduct a SCHOOL WATCHING EXCERCISE
- Observe safe and unsafe zones
- Suggest corrections for improvements
- Assess the structural integrity of the building/s
- Assess if the school location is tsunami prone
Good practices and safe zones:
- Swing out door
- Wide corridors
- Wide open space for evacuation
- Fire exits
- Public alarm system
Some of the unsafe zones:
- Windows and glass panes
- Book shelves, machinery, cabinets and furniture that may topple or slide
- Narrow alleys
Avoid passing near water tank
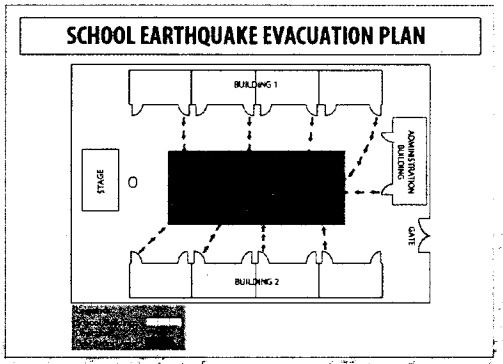
Use all available OPEN SPACES nearest to the building.

Determine if there is sufficient open space for all, set a buffer zone from the building.
Consider the number of students in each building (per session).Length × width = area(how many students?/1 square meter)
Make sure that evacuation route will not expose the students to additional hazards.
STAGE 3: ORIENTATION PRIOR TO THE CONDUCT OF AN EARTHQUAKE DRILL
A. Preparations
- Conduct of lectures about earthquake.
- Conduct classroom hazard observation activity
- Introduce evacuation plan
- Introduce assigned evacuation area
- Post the school evacuation map in every classroom and bulletin board
- Assign student in-charge of making sure the door is open during shaking
- Assign observes and evaluators who will give comments and suggestions
- Inform the neighborhood about the drill
- Check available alarm system
- Assign class marshall
- Take note of persons with disabilities (PWD), pregnant and elderly and identify their locations for evacuations
- Assign marshalls to assist the PWD, pregnant and elderly during evacuation.
B. Protect Yourself
What to do DURING an earthquake?
- DUCK, COVER and HOLD
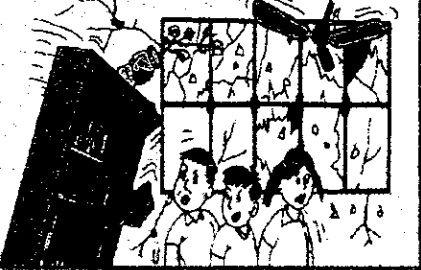
- Watch out for falling objects
- Keep calm and don't panic
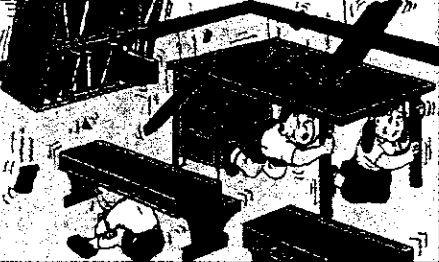
Keep away from glass window and heavy shelves.
STAGE 4: ACTUAL CONDUCT OF AN EARTHQUAKE DRILL
Phases of an Earthquake Drill
Phase 1. Alarm
During the drill, the 1-minute alarm indicates earthquake or shaking.
Phase 2. Response
While the alarm is ongoing, everyone should perform "duck, cover and hold". Remain in this position until the "shaking" stops.

Phase 3. Evacuation
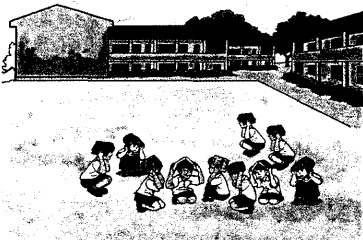
As soon as the shaking stops, immediately evacuate the school building and proceed to identified evacuation areas using the pre-determined routes guided by the class marshall or teacher.

Phase 4. Assembly
At the designated evacuation area, students must be grouped together according to the class where they belong.
Phase 5. Head Count
Teachers should check and make sure all students are accounted for.
Phase 6. Evaluation
The over-all coordinator will announce the termination of drill or "All clear".
An evaluation of the drill must be conducted to identify problems encountered during the drill and how these can be improved in future earthquake drills.
Observers will give their comments and suggestions when all are gathered in the evacuation areas.
WHEN IS THE TIME TO EVACUATE?
After a very strong earthquake wherein you lose balance or could not stand, and heavy objects and furniture start to be moved or shifted.
As need arises or as declared by authorities.
- https://www.affordablecebu.com/
